First things first - WHY CONTAINERS?
In simple terms, because it will make so much easy SelfHosting software for any of us.
And because devs can use it to make their software dependencies bullet proof to our different environments:
- Portability: Containers can run on any system that supports containerization, ensuring consistency across different development, testing, and production environments.
- Scalability: Containers can be easily replicated and orchestrated, enabling dynamic scaling in cloud environments.
- Isolation: Containers ensure that applications run in isolation, avoiding conflicts between dependencies.
- Efficiency: Containers use fewer resources than virtual machines since they share the host OS kernel, which makes them faster to start and more resource-efficient.
Containers are also used alongside container orchestration tools like: K8s, Docker Swarm, and OpenShift for managing large-scale deployments.
What are Containers?
Containers are lightweight, portable, and self-contained units of software that encapsulate an application and its dependencies, libraries, and configurations, enabling it to run consistently across different environments.
They are an essential part of modern software development, particularly in DevOps and cloud-native applications.
Unlike virtual machines, containers share the host system’s OS kernel, making them more efficient and faster to deploy.
Pre-Requisites for Containers
Before working with containers, you’ll need to set up the necessary tools and environments on your system.
Below are the steps to set up Docker and Podman, two of the most popular containerization tools.
You got it, most of the time it seems that containers=docker.
But there are few docker alternatives out there
Setup Docker
- Install Docker:
- On Linux: Use the following commands to install Docker on popular distributions:
sudo apt update
sudo apt install docker.io
sudo systemctl start docker
sudo systemctl enable docker
Alternatively, you can use Docker’s official installation guides for different distributions here.
- Verify Installation:
- After installation, check that Docker is running by typing:
docker --version #Docker version 27.4.0, build bde2b89
- To test Docker, run a simple container:
docker run hello-world
- Post-Installation (Linux):
- If you’re using Linux, you may want to add your user to the Docker group to avoid needing
sudofor Docker commands:
- If you’re using Linux, you may want to add your user to the Docker group to avoid needing
sudo usermod -aG docker $USER
- Start Using Docker:
- Docker uses commands like
docker build,docker run, anddocker psfor managing containers. You can start experimenting with Docker by pulling images from Docker Hub (e.g.,docker pull ubuntu).
- Docker uses commands like
Setup Podman
- Install Podman:
- On Linux: Use the package manager for your distribution:
- Ubuntu/Debian:
- On Linux: Use the package manager for your distribution:
sudo apt update
#sudo apt --fix-broken install
sudo apt install podman
- Verify Installation:
- After installing Podman, verify it, by checking the version:
podman --version #4.9.3 right now
#podman info
#ps aux | grep podman #see the process
systemctl status podman
- Test Podman:
- Just like Docker, Podman can run containers, and you can test Podman by running one:
podman run hello-world #it will pull the container from docker.io container registry
- Post-Installation (Linux):
- On Linux, add your user to the Podman group (if necessary):
sudo usermod -aG podman $USER
- Start Using Podman:
- Podman commands are similar to Docker’s. You can build images, run containers, and list running containers using commands like
podman build,podman run, andpodman ps.
- Podman commands are similar to Docker’s. You can build images, run containers, and list running containers using commands like
UI for Containers
While both Docker and Podman primarily operate from the command line, there are several UI tools that can help manage containers and make it easier to visualize and interact with your containers.
These will make your life easier when managing containers through an UI instead of the CLI:
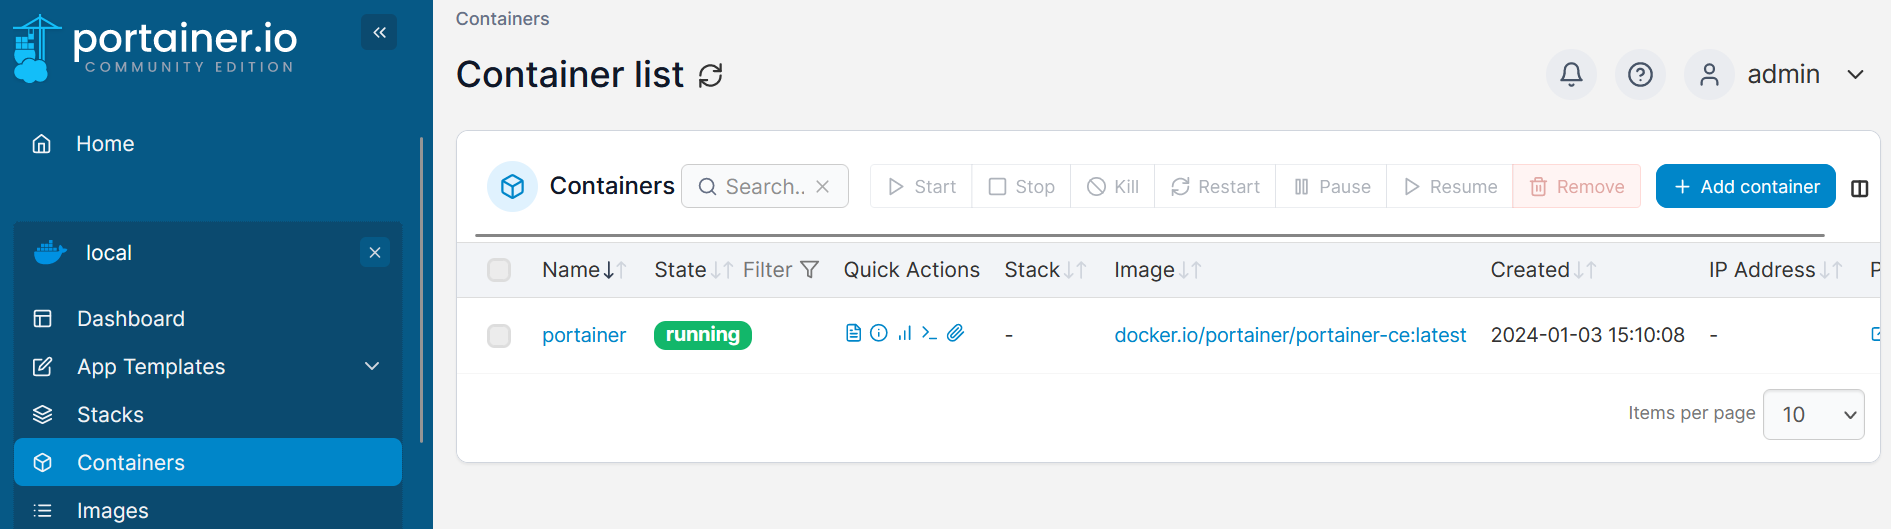
- Portainer:
- Platform: Linux, Windows, macOS (Docker and Podman support)
- Portainer is a popular open-source container management UI that can work with both Docker and Podman. It offers a web-based interface that allows users to manage containers, images, networks, and volumes with ease.
- To install Portainer:
#podman run -d -p 9000:9000 portainer/portainer-ce

sudo docker run -d -p 8000:8000 -p 9000:9000 --name=portainer --restart=always -v /var/run/docker.sock:/var/run/docker.sock -v portainer_data:/data portainer/portainer-ce

# podman run -d -p 8000:8000 -p 9000:9000 --name=portainer --restart=always -v /var/run/docker.sock:/var/run/docker.sock -v portainer_data:/data portainer/portainer-ce
- Access it by navigating to
http://localhost:9000in your browser.
- Dockge
- Dockge Official Site
- Dockge Source Code at Github
- License: MIT ❤️
**Dockge** with Docker CLI / Compose 👇
docker run -d \
  --name dockge \
  --restart unless-stopped \
  -p 5001:5001 \
  -v /var/run/docker.sock:/var/run/docker.sock \
  -v /home/your_user/Desktop/Dockge/data:/app/data \
  -v /home/your_user/Desktop/Dockge/stacks:/opt/stacks \
  -e DOCKGE_STACKS_DIR=/opt/stacks \
  louislam/dockge:1
version: "3.8"
services:
  dockge:
    image: louislam/dockge:1
    restart: unless-stopped
    ports:
      - 5001:5001
    volumes:
      - /var/run/docker.sock:/var/run/docker.sock
      - /home/your_user/Desktop/Dockge/data:/app/data
      # Stacks Directory
      # ⚠️ READ IT CAREFULLY. If you did it wrong, your data could end up writing into a WRONG PATH.
      # ⚠️ 1. FULL path only. No relative path (MUST)
      # ⚠️ 2. Left Stacks Path === Right Stacks Path (MUST)
      #- /opt/stacks:/opt/stacks
      - /home/your_user/Desktop/Dockge/stacks:/opt/stacks
    environment:
      # Tell Dockge where to find the stacks
      - DOCKGE_STACKS_DIR=/opt/stacks
Deploy with:
docker-compose up -d
You can access now Dockge at: http://localhost:5001
-
Cockpit:
- Platform: Linux (CentOS, Fedora, Ubuntu)
- Cockpit is a web-based server management tool that includes a container management feature. It allows you to view and manage containers, logs, and images from a user-friendly interface. Install with:
sudo apt install cockpit
sudo systemctl enable --now cockpit.socket
-
Kitematic (for Docker):
- Platform: Windows/macOS
- Kitematic is a simple, open-source GUI for Docker that allows developers to easily create, configure, and run Docker containers. It provides a smooth experience for users new to containerization.
-
Yatch
These UI tools provide a more intuitive and accessible way to manage containers, especially for those less familiar with the command line.
How can I create a Container?
You will need:
- Dockerfile - It tells what exactly you want to build, from where to take the source code files, etc
- Docker-Compose (optional to build, recommended to deploy later on)
- Depending on the app, there are optional files for good practices - In Python for example a
requirements.txt
Containers with CLI
Building from local files:
docker build -t your_container_name .
#docker image ls #to check the images locally
In recent docker versions, there is a new method - buildx [QEMU related to emulate x86/arm64…]
docker --version
docker login
docker buildx ls #show available builders (you will see the default)
More about docker buildX 👇
Create a new one, to have a scoped environment for our builds
docker buildx create --name mybuilder
docker buildx use mybuilder
docker buildx inspect --bootstrap
Its all about the architecture: x86 vs ARM
RPi’s / amazon graviton (ARM virtual machines in AWS…) / M1 chips..
docker manifest inspect python:3.12.4

docker manifest inspect fossengineer/trip_planner #https://hub.docker.com/r/fossengineer/trip_planner/tags
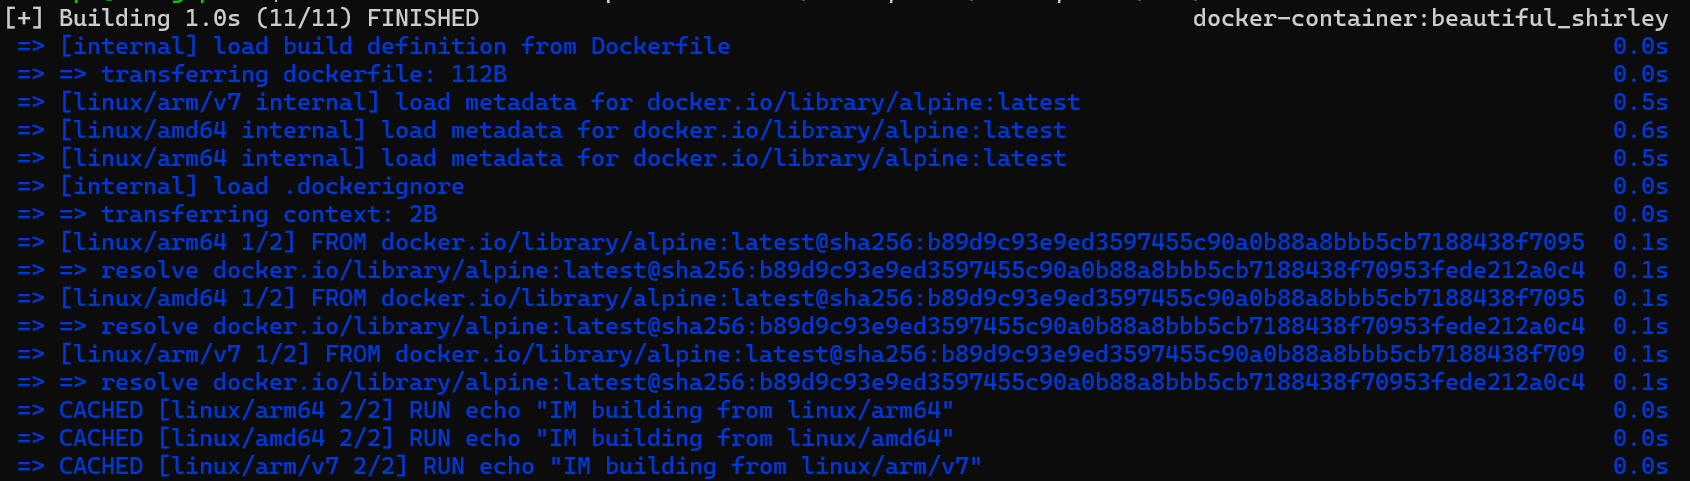
Separate builds on each arch + manifest to glue them all
Try that it works with:
FROM alpine
ARG TARGETPLATFORM
RUN echo "IM building from $TARGETPLATFORM"
#docker buildx build --platform linux/amd64,linux/arm64,linux/arm/v7 -t testmultiplat .
#this will build and push the image and manifest to the registry
docker buildx build --platform linux/amd64,linux/arm64,linux/arm/v7 -t fossengineer/multiarchtest --push .
docker inspect --format '{{index .Config.Labels "maintainer"}}' <image-name-or-id>
Pushing Local Containers to CR
After you build your container image, you can upload it also with CLI to one of the container registries.
For example, to push a container to Dockerhub:
- login to DockerHub
- and push the image
#docker build -t your_dockerhub_account/your_container_name .
#docker login
#docker push your_dockerhub_account/your_container_name
Creating Containers with Leverage
Knowing the most useful Docker CLI commands is great.
But there are some ways to automate how we build them.
Containers with Github Actions
You can use Github Actions to create containers for you.
You will need a Github Actions Workflow configuration
The CI/CD workflow specifications for your App .github/workflows/ci_cd.yml:
And this workflow will not only create a MultiArch (x86, ARM64) container, but it will also publish it to Github Container Registry

This example builds and pushes a Python App Container, whenever:
- main receives a push
- also as per trigger button.
name: CI/CD Build MultiArch Python Container

on:
  push:
    branches:
      - main
  workflow_dispatch: #also works when triggered manually

jobs:
  build-and-push:
    runs-on: ubuntu-latest

    steps:
    - name: Checkout repository
      uses: actions/checkout@v2

    - name: Set up QEMU
      uses: docker/setup-qemu-action@v1

    - name: Set up Docker Buildx
      uses: docker/setup-buildx-action@v1

    - name: Login to GitHub Container Registry
      uses: docker/login-action@v1
      with:
        registry: ghcr.io
        username: ${{ github.actor }}
        password: ${{ secrets.CICD_TOKEN }}

    - name: Build and push Docker image
      uses: docker/build-push-action@v2
      with:
        context: .
        push: true
        platforms: linux/amd64,linux/arm64
        tags: |
          ghcr.io/your_gh_user/your_python_gh_project:v1.0
          ghcr.io/your_gh_user/your_python_gh_project:latest
GH Actions to Create a HUGO Blog with GH Pages 👇
You know I am a big fan of SSGs, particularly about HUGO.
And if you are familiar with HUGO already and have a Github Repository, you can already have a free website accesible by anyone with this GHActions Workflow:
name: Deploy Hugo site to Github Pages

on:
  push:
    branches: ["main"]
  workflow_dispatch:

permissions:
  contents: read
  pages: write
  id-token: write

concurrency:
  group: "pages"
  cancel-in-progress: false

defaults:
  run:
    shell: bash

jobs:
  # Build job
  build:
    runs-on: ubuntu-latest
    env:
      HUGO_VERSION: 0.117.0
    steps:
      - name: Checkout
        uses: actions/checkout@v4
        with:
          fetch-depth: 0
      - name: Setup Go
        uses: actions/setup-go@v4
        with:
          go-version: '1.21'
      - name: Setup Hugo
        uses: peaceiris/actions-hugo@v2
        with:
          hugo-version: '0.117.0'
          extended: true
      - name: Build with Hugo
        env:
          HUGO_ENVIRONMENT: production
          HUGO_ENV: production
        run: |
          hugo --gc --minify --baseURL "https://${{ github.repository_owner }}.github.io/${{ github.event.repository.name }}/"
      - name: Upload artifact
        uses: actions/upload-pages-artifact@v2
        with:
          path: ./public

  # Test job (can be skipped if it fails)
  test:
    runs-on: ubuntu-latest
    needs: build
    continue-on-error: true  # This allows the job to fail without failing the entire workflow
    steps:
      - name: Checkout
        uses: actions/checkout@v4
        with:
          fetch-depth: 0
      - name: Install linkchecker #To check if there are broken links on the built website
        run: sudo apt-get install -y linkchecker
      - name: Run LinkChecker
        run: |
          linkchecker ./public/ \
            --ignore-url "/^http:\/\/127.0.0.1/,/^http:\/\/0.0.0.0/,/^http:\/\/localhost/" || echo "LinkChecker found errors, but continuing..."

  # Deploy job
  deploy:
    environment:
      name: github-pages
      url: ${{ steps.deployment.outputs.page_url }}
    runs-on: ubuntu-latest
    needs: build
    steps:
      - name: Deploy to GitHub Pages
        id: deployment
        uses: actions/deploy-pages@v2
GH Actions also works great to Create Associated SliDev Repo PPTs 👇
I mean, you can have a cool Web Presentation, made with code thanks to SliDev.
On the same repo, just create a folder (slidev on this example) that will generate the static GH Pages, for free.
No need to tweak these, as it will automatically collect your repo and username and take the build static files from slidev/dist
It also adapts the base path, so that it will match the repo name, so that you ll see it at https://your_gh_user.github.io/repo-name/
name: Deploy Slidev site to Github Pages

on:
  # push:
  #   branches: ["main"]
  workflow_dispatch:

permissions:
  contents: read
  pages: write
  id-token: write

concurrency:
  group: "pages"
  cancel-in-progress: false

defaults:
  run:
    shell: bash

jobs:
  build:
    runs-on: ubuntu-latest
    env:
      NODE_VERSION: 18
      REPO_NAME: ${{ github.repository }}
    steps:
      - name: Checkout
        uses: actions/checkout@v4
        with:
          fetch-depth: 0
      - name: Setup Node.js
        uses: actions/setup-node@v2
        with:
          node-version: ${{ env.NODE_VERSION }}
      - name: Install dependencies
        run: |
          cd ./slidev
          npm install
      - name: Build Slidev project
        run: |
          cd ./slidev
          npm install -g @slidev/cli #npm install --save-dev @slidev/cli
          npm i -D playwright-chromium
        # slidev build --base /your-repository-name/
          slidev build --base /${{ env.REPO_NAME }}/
      - name: Upload artifact
        uses: actions/upload-pages-artifact@v2
        with:
          path: ./slidev/dist

  deploy:
    environment:
      name: github-pages
      url: ${{ steps.deployment.outputs.page_url }}
    runs-on: ubuntu-latest
    needs: build
    steps:
      - name: Deploy to GitHub Pages
        id: deployment
        uses: actions/deploy-pages@v2
Containers with Jenkins
You can also use Jenkins to have a fully open and local automatic container workflow.
Conclusions
Now what?
You are ready for both:
- Creating containerized apps
Run your containerized app with:
#docker run -p 8050:8050 your_container_name
#docker run --name your_container_INSTANCE_name -p 8050:8050 your_container_name -d
- Ready to SelfHost!
#!/bin/sh


### DOCKER SETUP ###

# Function to install Docker and Docker Compose
install_docker() {
    echo "Updating system and installing required packages..."
    apt-get update && apt-get upgrade -y
    echo "Downloading Docker installation script..."
    curl -fsSL https://get.docker.com -o get-docker.sh
    sh get-docker.sh
    echo "Docker installed successfully. Checking Docker version..."
    docker version
    echo "Testing Docker installation with 'hello-world' image..."
    docker run hello-world
    echo "Installing Docker Compose..."
    apt install docker-compose -y
    echo "Docker Compose installed successfully. Checking version..."
    docker-compose --version
    echo "Checking status of Docker service..."
    #systemctl status docker
    systemctl status docker | grep "Active"
    # docker run -d -p 8000:8000 -p 9000:9000 --name=portainer --restart=always -v /var/run/docker.sock:/var/run/docker.sock -v portainer_data:/data portainer/portainer-ce

}


# Ask user if they want to install Docker - https://jalcocert.github.io/RPi/posts/selfhosting-with-docker/#install-docker
echo "Do you want to install Docker on your system? (yes/no)"
read install_docker_answer
case $install_docker_answer in
    [yY] | [yY][eE][sS])
        install_docker
        ;;
    [nN] | [nN][oO])
        echo "Docker installation skipped."
        ;;
    *)
        echo "Invalid response. Exiting."
        exit 1
        ;;
esac
FAQ
Where to Store/Retrieve Containers
Container Registries are a central repository for storing and managing software container images, similar to a library of software “recipes.”
DockerHub
- The most popular container registry and default for Docker.
- Offers both public and private repositories, with a free tier.
- Image format:
docker.io/your_dockerhub_user/your_container_name:container_version - Example:
docker.io/python:latest
Linux Server Container Registry (lscr)
- Provided by Linuxserver.io, which offers Docker images for open-source apps.
- Registry URL:
lscr.io - Example images available on the site: [Fresh RSS], [Grav CMS], [WebTops].
GitHub and GitLab Container Registries
- Integrated with their respective platforms, making them ideal for users in those ecosystems.
- GitLab images use
registry.gitlab.com, GitHub usesghcr.io. - Example configurations for containers from both platforms are shown.
Google Container Registry (GCR)
- A reliable, secure container registry from Google Cloud.
- May be more expensive if usage exceeds the free tier.
Quay
- Owned by Red Hat, offering advanced features like vulnerability scanning and access control.
- Available at: https://quay.io.
Useful Docker CLIs
For SelfHosting, I try to remember these:
docker builder prune
#docker system prune -a
docker volume prune
docker image prune -a
What if Im not using Linux?
You can install docker/podman for Windows or mac as well.
Containers and Backup
Portainer Backup
Sometimes it happens, our PCs require some mainteinance, but dont panic just backup portainer:
sudo fdisk -l #get the drive
sudo mkdir /mnt/external_500gb
sudo mount /dev/sda1 /mnt/external_500gb #mount the drive

mkdir /mnt/external_500gb/Z_SelfH_Backup/portainer_data/_data/
sudo cp -r /mnt/portainer_backup/var/lib/docker/volumes/portainer_data/_data/* /mnt/external_500gb/Z_SelfH_Backup/portainer_data/_data/
Recover with:
docker volume inspect portainer_data #see where the named volume is stored and use it as destination

sudo cp -r /mnt/data_ntfs_500/Z_SelfH_Backup/portainer_data/_data/* /var/lib/docker/volumes/portainer_data/_data/
Updating Containers
You can use Wathtower.
Just make sure you have set proper containers backup, in case that some incompatibility appears, as it could potentially break your setup.
Interesting Related Videos
Docker and P2P
There is a way to share containers in a decentralized p2p way.
It is thanks to the DragonFly Project: https://github.com/dragonflyoss/dragonfly
Which is F/OSS under Apache v2 license ✅
Remember that you can run torrenting clients to share such images with a VPN to protect your public IP:
Comments