Planning your next big trip?
Want a beautiful and organized way to track your past adventures?
AdventureLog is a fantastic open-source travel companion that lets you do all of that and more!
What is AdventureLog?
AdventureLog is designed to be the ultimate travel companion, offering features like:
-
Adventure Tracking: Log past trips with details like location, date, and descriptions.
-
Trip Planning: Plan future itineraries with integrated tools for flights, notes, and more.
-
Collaboration: Share your adventures and collaborate on trips with friends and family.
-
World Map Visualization: See your travels plotted on an interactive world map.
-
World Travel Book: Keep track of the countries and regions you’ve visited.
Why Self-Host AdventureLog?
Self-hosting offers several advantages:
- Data Privacy: Your travel information stays on your own server.
- Customization: You have more control over the application’s configuration.
- Community: You become part of the AdventureLog community.
Self-Hosting AdventureLog with Docker
Here’s how to get AdventureLog running on your own server using Docker and Docker Compose:
-
Prerequisites: Ensure you have Docker and Docker Compose installed on your system. You can find installation instructions on the official Docker website: https://www.docker.com/
-
Clone the Repository: Clone the AdventureLog repository from GitHub:
git clone https://github.com/seanmorley15/AdventureLog.git
cd AdventureLog
- Docker Compose Configuration: AdventureLog uses Docker Compose for easy setup. You’ll find a
docker-compose.ymlfile in the repository.
This file defines the services (database, web application) and their dependencies, all packed within containers.
wget https://raw.githubusercontent.com/seanmorley15/AdventureLog/main/docker-compose.yml
#version: "3.9"
services:
  db:
    container_name: adventurelog_db
    image: postgres:16-alpine
    restart: always
    environment:
      POSTGRES_DB: adventurelog
      POSTGRES_USER: adventurelog
      POSTGRES_PASSWORD: your_strong_password  # **IMPORTANT: Change this!**
    volumes:
      - db_data:/var/lib/postgresql/data
    healthcheck:
      test: ['CMD-SHELL', 'pg_isready -U adventurelog -d adventurelog']
      interval: 5s
      timeout: 5s
      retries: 5

  web:
    container_name: adventurelog_web
    build:
      context: ./
      dockerfile: Dockerfile
    restart: always
    ports:
      - "8000:8000" # Maps host port 8000 to container port 8000
    depends_on:
      db:
        condition: service_healthy
    environment:
      - DATABASE_URL=postgres://adventurelog:your_strong_password@db:5432/adventurelog
      - SECRET_KEY=your_secret_key # **IMPORTANT: Change this!**
      # Add other environment variables as needed (see documentation)
    volumes:
      - static_volume:/app/staticfiles
      - media_volume:/app/media

volumes:
  db_data:
  static_volume:
  media_volume:
Initial creds are set with the
docker-compose.yml, admin/admin on this example.
- Crucially: Replace
your_strong_passwordwith a strong, unique password. Also, replaceyour_secret_keywith a long, randomly generated secret key. Do not use these example values in production. See the “Security Considerations” section below. - Review the
docker-compose.ymlfile and the AdventureLog documentation for any other environment variables you might need to configure.
- Build and Run: Navigate to the AdventureLog directory in your terminal and run:
docker-compose up -d
This command will build the Docker image (if necessary), create the containers, and start AdventureLog in detached mode.
- Access AdventureLog: Once the containers are running, you can access AdventureLog in your web browser by navigating to
http://your_server_ip:8000(replaceyour_server_ipwith the IP address of your server).
Security Considerations
- Strong Passwords: Never use the example password in a production environment. Generate a strong, unique password for your PostgreSQL database.
- Secret Key: The
SECRET_KEYis crucial for Django’s security. Generate a long, random string for this value. - Reverse Proxy (Recommended): For production deployments, it’s highly recommended to use a reverse proxy like Nginx or Traefik. A reverse proxy provides additional security features, including SSL/TLS termination.
- Data Backups: Regularly back up your database volume (
db_data) to prevent data loss.
Conclusion
Self-hosting AdventureLog with Docker gives you a powerful and private way to manage your travel experiences.
With a little setup, you can have your own instance of AdventureLog up and running in no time.
Start exploring and documenting your adventures!
BONUS
AdventureLog with Immich
It can also be integrated with Immich!
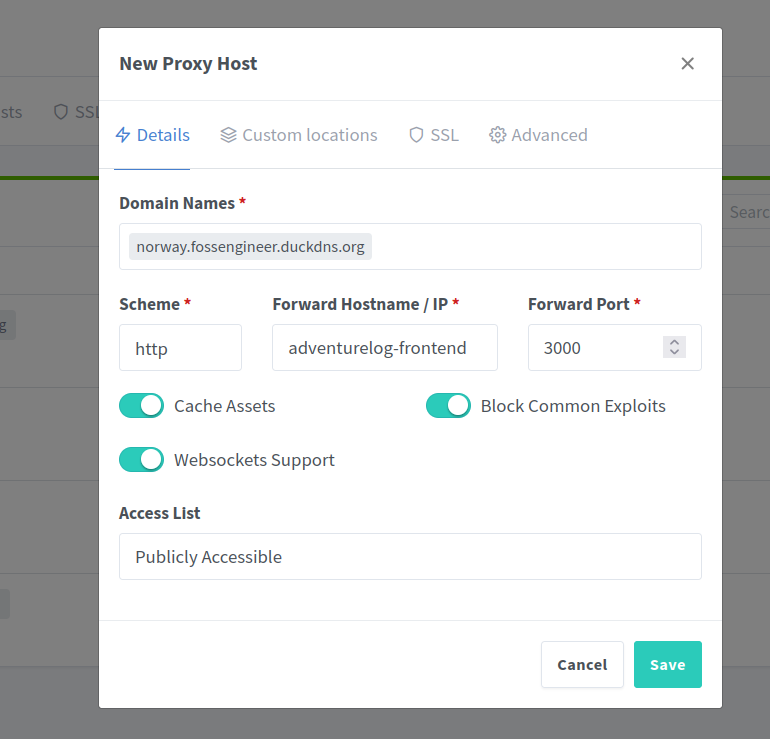
AdventureLog with NGINX
It seems that this is a Python Django backend.
But we can just plug NGINX into the docker compose stack like so:
#version: "3.9"

services:
  web:
    image: ghcr.io/seanmorley15/adventurelog-frontend:latest
    container_name: adventurelog-frontend
    restart: unless-stopped
    environment:
      - PUBLIC_SERVER_URL=http://server:8000
      - ORIGIN=http://localhost:8015
      - BODY_SIZE_LIMIT=Infinity
    ports:
      - "8015:3000"
    depends_on:
      - server
    networks:
      - adventurelog_net  # Use the internal network
      # - nginx_nginx_default #for https

  db:
    image: postgis/postgis:15-3.3
    container_name: adventurelog-db
    restart: unless-stopped
    environment:
      POSTGRES_DB: database
      POSTGRES_USER: adventure
      POSTGRES_PASSWORD: changeme123
    volumes:
      - postgres_data:/var/lib/postgresql/data/
    networks:
      - adventurelog_net  # Use the internal network

  server:
    image: ghcr.io/seanmorley15/adventurelog-backend:latest
    container_name: adventurelog-backend
    restart: unless-stopped
    environment:
      - PGHOST=db  # Use the service name 'db' as the hostname
      - PGDATABASE=database
      - PGUSER=adventure
      - PGPASSWORD=changeme123
      - SECRET_KEY=changeme123
      - DJANGO_ADMIN_USERNAME=admin #you will need this
      - DJANGO_ADMIN_PASSWORD=admin #to make the first login
      - [email protected]
      - PUBLIC_URL=http://localhost:8016 # Match the outward port, used for the creation of image urls
      - CSRF_TRUSTED_ORIGINS=http://localhost:8016,http://localhost:8015
      - DEBUG=False
      - FRONTEND_URL=http://localhost:8015 # Used for email generation. This should be the url of the frontend
    ports:
      - "8016:80"  # Expose the backend port
    depends_on:
      - db
    volumes:
      - adventurelog_media:/code/media/
    networks:
      - adventurelog_net  # Use the internal network

volumes:
  postgres_data:
  adventurelog_media:

networks:
  adventurelog_net:  # Define the internal network
  # nginx_nginx_default:
  #   external: true #for https
Initial creds are set with the
docker-compose.yml, admin/admin on this example.