Ready to dive into self-hosted web analytics?
Well, with Swetrix you will get something more, you will understand the story behind your customers.
In this post, you’ll be setting up Swetrix, a privacy-focused, cookie-less, open source analytics platform.
Discover how to deploy the Nest.js backend, Remix frontend, and configure MySQL & Clickhouse.
Master selfhosting best practices for ultimate data ownership and start collecting your website’s actionable insights.
Project Overview: Swetrix
Swetrix is an open source, privacy-centric web analytics suite offering features like real-time visitor tracking, session recordings, pageflow analysis, and customizable dashboards.
Built with a Nest.js backend alongside MySQL and Clickhouse databases, and a Remix-based frontend, Swetrix delivers enterprise-grade analytics without compromising data ownership.
Why Swetrix Matters for Self-Hosting Enthusiasts
- ⚙️ Streamlined setup with Docker & Compose
- 🔒 Full data privacy & cookie-less tracking (forget about the cookie banner)
- 🚀 Scalable architecture using MySQL & Clickhouse
- Also can measure your page performance!
- 🌐 Extensible modules: authentication, integrations, and custom metrics
And you get interesting features, like funnels or even an open source captcha widget.
Swetrix CAPTCHA is a fully open source, cookieless and privacy-friendly CAPTCHA service. It is designed to be used on websites and web applications to prevent bots from performing automated actions.
The CAPTCHA challenge is presented to the user in the form of sequence of letters and numbers. T
Swetrix Tech Overview
Swetrix comprises a modular Nest.js monorepo in TypeScript and a Remix + React frontend styled with Tailwind CSS.
The backend leverages TypeORM for MySQL ORM, a Clickhouse client for analytics, Redis for caching, and integrates Sentry for observability.
On the front, React Router-based routes serve dynamic dashboards with D3.js, Billboard.js, and Nivo for visualizations.
Linters and static analysis tools (ESLint, TypeScript, ts-prune) enforce code quality.
Module Descriptions
- backend/apps/cloud: Core API server handling authentication, analytics endpoints, integrations, and mailing.
- backend/apps/community: Community Edition variant with simplified feature set.
- backend/migrations: Database migration scripts for MySQL and Clickhouse.
- web/app: Remix routes, components, and styles for the UI dashboard.
- web/public: Static assets, including images and manifest files.
- blog-posts: Markdown-driven content for the Swetrix blog.
Key Concepts and Algorithms
Swetrix employs sessionization algorithms to group user events into coherent sessions.
Custom funnel analysis is implemented by aggregating event streams in Clickhouse.
UA parsing leverages uaparser libraries for browser/device insights.
Data transformers normalize raw event payloads, and sampling strategies ensure cost-effective Clickhouse queries.
About Swetrix Dependencies ⏬
- Nest.js (TypeScript API framework)
- TypeORM & mysql2 (MySQL ORM)
- @clickhouse/client (Clickhouse connector)
- Remix & React Router (Frontend framework)
- Tailwind CSS (Utility-first styling)
- D3.js, Billboard.js, Nivo (Data visualization)
- Redis, dotenv, bcrypt, passport (Auth & caching)
- ESLint, Prettier, TypeScript (Static code analysis)
Deployment: Self-hosting Swetrix
Swetrix provides official self-hosting docs, but you can simply deploy locally with Docker Compose
Deploy with Docker Compose
We can use a docker-compose as the only configuration required to SelfHost Swetrix.
How to SelfHost Swetrix ⏬
services:
  # This is Swetrix user interface application, it's used to display the analytics data, render charts, etc.
  swetrix: #https://docs.swetrix.com/selfhosting/how-to
    image: swetrix/swetrix-fe:v3.3.1 #https://github.com/swetrix/selfhosting
    restart: always
    depends_on:
      - swetrix-api
    ports:
      - '80:3000'
    environment:
      - API_URL=${API_URL}
    healthcheck:
      test: ["CMD-SHELL", "wget --no-verbose --tries=1 --spider http://localhost:3000/ping || exit 1"]
      interval: 30s
      start_period: 15s

  # This is Swetrix API, it's purpose is to collect incoming analytical events and serve the data to the UI
  swetrix-api:
    image: swetrix/swetrix-api:v3.3.1
    restart: always
    container_name: swetrix-api
    ports:
      - '8080:5005'
    environment:
      # Configurable with .env file
      - JWT_ACCESS_TOKEN_SECRET=${JWT_ACCESS_TOKEN_SECRET}
      - JWT_REFRESH_TOKEN_SECRET=${JWT_REFRESH_TOKEN_SECRET}
      - EMAIL=${EMAIL}
      - PASSWORD=${PASSWORD}
      - API_KEY=${API_KEY}
      - IP_GEOLOCATION_DB_PATH=${IP_GEOLOCATION_DB_PATH}
      - DEBUG_MODE=${DEBUG_MODE}
      - CLOUDFLARE_PROXY_ENABLED=${CLOUDFLARE_PROXY_ENABLED}

      # Redis and Clickhouse are required for the API to work
      - REDIS_HOST=redis
      - CLICKHOUSE_HOST=http://clickhouse
    links:
      - 'redis'
      - 'clickhouse'
    depends_on:
      redis:
        condition: service_healthy
      clickhouse:
        condition: service_healthy
    healthcheck:
      test: ["CMD-SHELL", "wget --no-verbose --tries=1 --spider http://localhost:5005/ping || exit 1"]
      interval: 30s
      start_period: 15s

  redis:
    image: redis:7.2-alpine
    restart: always
    environment:
      - REDIS_PORT=6379
      - REDIS_USER=default
      - REDIS_PASSWORD=${REDIS_PASSWORD}
    healthcheck:
      test: ["CMD-SHELL", "redis-cli ping | grep PONG"]
      interval: 30s
      start_period: 1m

  clickhouse:
    image: clickhouse/clickhouse-server:24.10-alpine
    container_name: clickhouse
    environment:
      - CLICKHOUSE_DATABASE=analytics
      - CLICKHOUSE_USER=default
      - CLICKHOUSE_PORT=8123
      - CLICKHOUSE_PASSWORD=${CLICKHOUSE_PASSWORD}
    healthcheck:
      test: ["CMD-SHELL", "wget --no-verbose --tries=1 -O - http://127.0.0.1:8123/ping || exit 1"]
      interval: 30s
      start_period: 1m
    restart: always
    cap_add:
      - SYS_NICE
    volumes:
      - swetrix-events-data:/var/lib/clickhouse
      # Disable logging
      - ./clickhouse/reduce-logs.xml:/etc/clickhouse-server/config.d/reduce-logs.xml:ro
      - ./clickhouse/disable-user-logging.xml:/etc/clickhouse-server/users.d/disable-user-logging.xml:ro

      # Reduce RAM usage
      - ./clickhouse/preserve-ram-config.xml:/etc/clickhouse-server/config.d/preserve-ram-config.xml:ro
      - ./clickhouse/preserve-ram-user.xml:/etc/clickhouse-server/users.d/preserve-ram-user.xml:ro
    ulimits:
      nofile:
        soft: 262144
        hard: 262144
volumes:
  swetrix-events-data:
    driver: local
swetrix-api - the main API server running on port 8080 by default swetrix-fe - the frontend server running on port 80 by default Redis server for caching Clickhouse server for analytics and transactional data
After starting the container you can access the dashboard at http://{host}:80.
You will require to setup a .env with your desired user/pass among other variables.
That can also be done with the configure.sh script, but these are the ones you need:
# Swetrix Frontend configuration
API_URL=localhost

# Swetrix API configuration
JWT_ACCESS_TOKEN_SECRET=createonetoken
JWT_REFRESH_TOKEN_SECRET=somejwttoken
[email protected]
PASSWORD=somecoolpassword
CLOUDFLARE_PROXY_ENABLED=false
DEBUG_MODE=false
API_KEY=
IP_GEOLOCATION_DB_PATH=


# Keep these empty unless you manually set passwords for your databases
REDIS_PASSWORD=
CLICKHOUSE_PASSWORD=
In this compose for Swetrix, we have few services that will be started together:
sudo docker compose up -d
- db: MySQL storage for core data.
- clickhouse: High-performance analytics database.
- redis: Cache and rate-limiting store.
- backend: Nest.js API server.
- frontend: Remix-based UI server.
Once running, you can navigate to the frontend port and login into your dashboard as per your .env configured admin and pass:
Configuration
Adjust .env or Compose environment variables to suit your domain, secrets, and resource constraints.
Ensure JWT_SECRET keys are secure and set OIDC_ENABLED or external integration flags as needed.
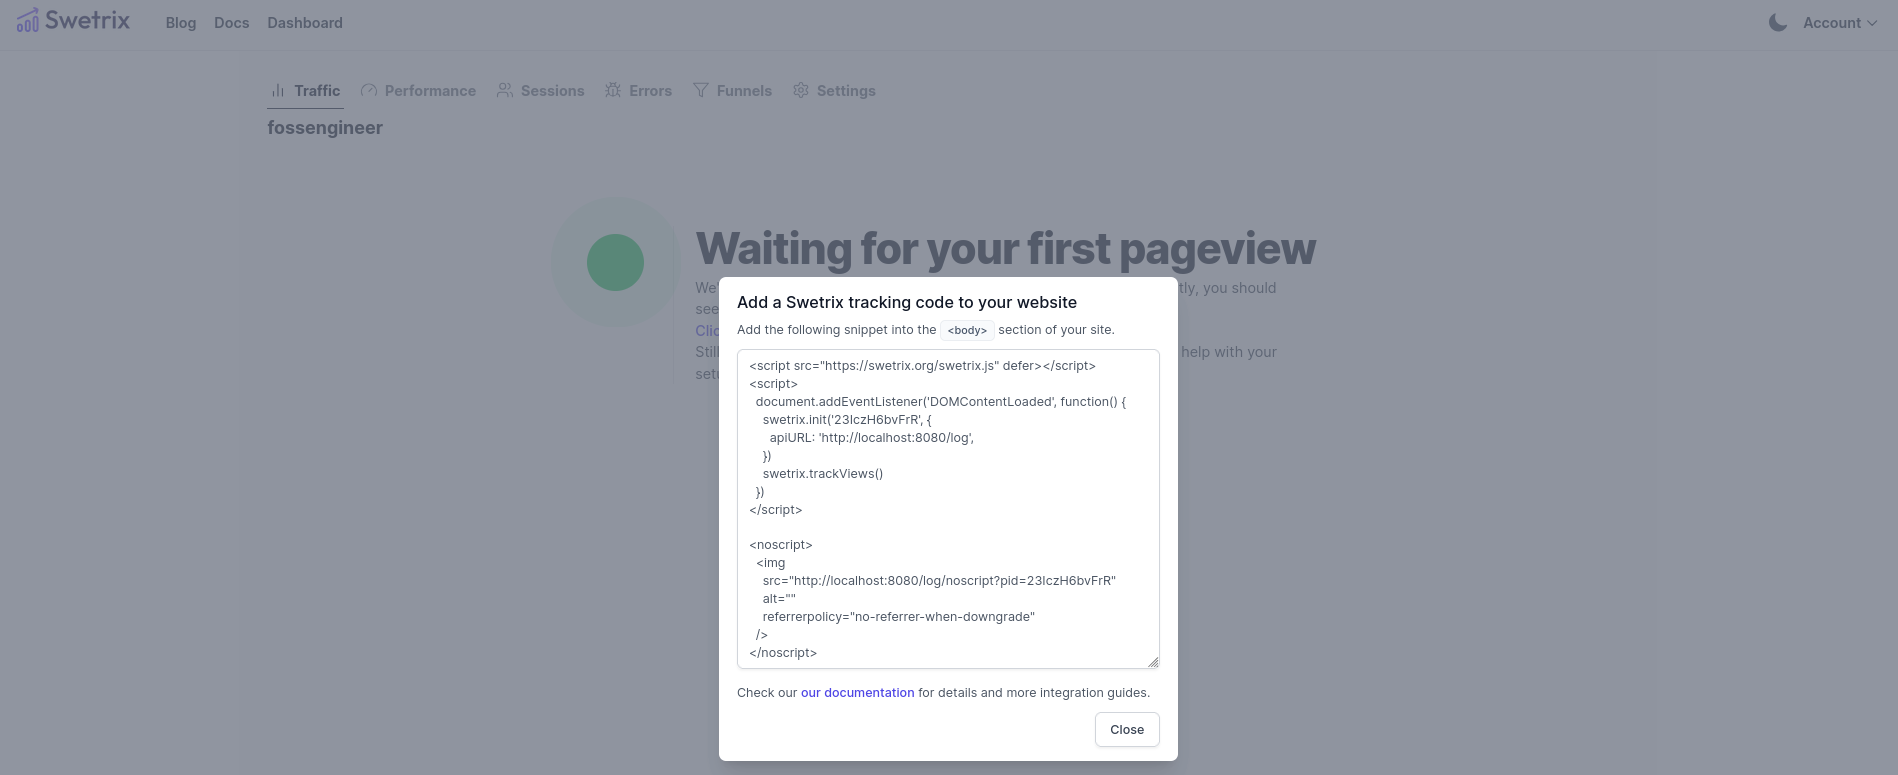
The JS code you will need to embed it into your site, looks like:
<script src="https://swetrix.org/swetrix.js" defer></script>
<script>
  document.addEventListener('DOMContentLoaded', function() {
    swetrix.init('23IczH6bvFrR', {
      apiURL: 'http://localhost:8080/log',
    })
    swetrix.trackViews()
  })
</script>

<noscript>
  <img
    src="http://localhost:8080/log/noscript?pid=23IczH6bvFrR"
    alt=""
    referrerpolicy="no-referrer-when-downgrade"
  />
</noscript>
Conclusion
In this guide, we explored how to self-host Swetrix, covering project architecture, modules, dependencies, and a Docker-based deployment.
With Swetrix, you gain full data control, privacy, and extensible analytics: not just visitor counts, but.
As you could expect, Swetrix related services are not the most lightweight with ~500mb RAM usage
docker stats $(docker-compose -f compose.yaml ps -q)

Latest Releases
v3.3.1: Patch release with minor bug fixes and performance tweaks. v3.3.0: Introduced custom event analytics and enhanced session visualization. v3.2.x: Improved UI components, i18n support, and dashboard optimizations.
Alternative self-hosted platforms to Swetrix could be: Umami, Tianji…