In this blog post, we’ll explore what Uptime Kuma is, how it works, and why you might want to consider using it for your own monitoring needs.
We’ll cover topics such as installing and configuring Uptime Kuma, setting up checks to monitor the health and performance of your web applications and infrastructure, and using the platform’s powerful features to improve the reliability and uptime of your applications.
-
Installation and Configuration:
- Learn how to deploy and configure Uptime Kuma for your monitoring needs.
-
Check Setup:
- Set up checks to monitor the health and performance of your web applications and infrastructure.
-
Powerful Features:
- Explore the platform’s powerful features to enhance the reliability and uptime of your applications.
Whether you’re a developer, a sysadmin, or just someone who wants to ensure that their applications are running smoothly, Uptime Kuma has everything you need to monitor your applications with confidence.
The Uptime Kuma Project
Uptime Kuma is a FREE, versatile and customizable monitoring tool that offers a wide range of features and benefits for users.
Why Uptime Kuma?
-
📈 Real-Time Monitoring: Uptime Kuma offers real-time monitoring of your Docker services, enabling quick identification of issues for timely response and prevention of major problems.
-
🚨 Customizable Alerts: Set up customizable alerts with Uptime Kuma for your services, ensuring you’re promptly notified via email or other channels when an issue arises.
-
📊 Historical Data: Access historical data provided by Uptime Kuma to track the performance of your services over time, helping you identify trends and patterns.
-
🛠️ Easy to Use: Enjoy the user-friendly interface and straightforward setup process of Uptime Kuma, making it hassle-free to monitor your services.
Deploying Uptime Kuma
The concept of Uptime Kuma is great.
And even better is that we can use UpTime Kumain a simple way with Docker.
| What You Will Need | How to Do It / Why |
|---|---|
| Understanding Why Monitoring ✅ | It’s important to understand the significance of monitoring to effectively utilize tools like Uptime Kuma |
| Docker Installed 🐋 | Required to deploy Uptime Kuma in a reliable manner |
| Portainer (Optional) | A graphical user interface (GUI) for Docker, allowing you to manage containers without using command-line interface (CLI) commands. |
| NGINX (Optional) | NGINX can be used as a reverse proxy for Uptime Kuma, providing additional security and routing capabilities if needed. |
Just Get Ready to use Uptime Kuma with Docker! 🚀
You can install Docker for any PC, Mac, or Linux at home or in any cloud provider that you wish. It will just take a few moments. If you are on Linux, just:
apt-get update && sudo apt-get upgrade && curl -fsSL https://get.docker.com -o get-docker.sh
sh get-docker.sh
#sudo apt install docker-compose -y
And install also Docker-compose with:
apt install docker-compose -yWhen the process finishes, you can use it to self-host other services as well. You should see the versions with:
docker --version
docker-compose --version
#sudo systemctl status docker #and the status
Docker will make your life easier to try and SelfHost new services like this one.
SelfHosting Uptime Kuma
If you know the Docker drill already and are in a rush - This is the Docker CLI to deploy Uptime Kuma:
docker run -d --name uptimekuma -p 3001:3001 -v /home/user_name/Docker/uptime-kuma/data:/app/data --restart=unless-stopped louislam/uptime-kuma:1
We are using the pre-build Uptime Kuma Docker Image ready at * DockerHub UptimeKuma
If you are not confortable with the terminal, keep reading below.
Uptime Kuma Docker Compose
This is the Uptime Kuma Docker-Compose file that we need to SelfHost it.
version: '3'
services:
  app:
    container_name: uptimekuma
    image: 'louislam/uptime-kuma:1'
    ports:
      - '3001:3001'
    volumes:
      - /home/user_name/Docker/uptime-kuma/data:/app/data
    restart: unless-stopped

#     networks:
#       - cloudflare_tunnel
#       - nginx_default

# networks:
#   cloudflare_tunnel:
#     external: true
#   nginx_default:
#     external: true
Then just apply this command ( or copy paste as a Portainer Stack! )
sudo docker-compose up -d
And you just got UptimeKuma deployed with Docker!
Access to Uptime Kuma Dashboard at: localhost:3001
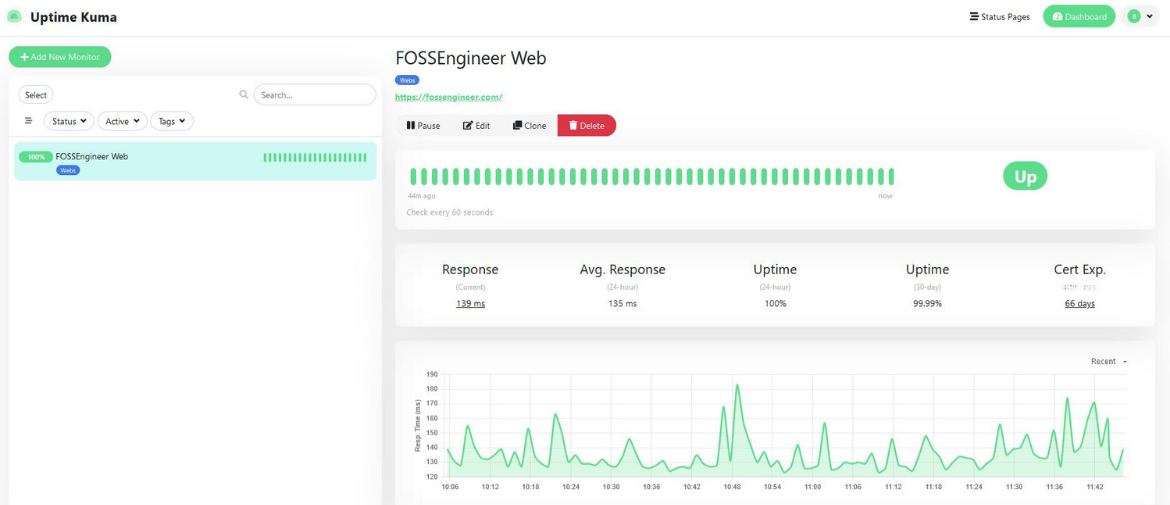
And this is how informative Uptime Kuma can be, for example, see the status of any of your Websites:

Uptime Kuma with NGINX Proxy Manager
If you are interested to expose Uptime Kuma to the internet, you will want to run Uptime kuma behind a NGINX proxy.
Follow this steps:
- Step 1: create your separate NGINX proxy manager docker container instance as covered in this post.
- Step 2: use this docker-compose file that will make available Uptime Kuma service on the NGINX network automatically
version: '3'
services:
  app:
    container_name: uptimekuma
    image: 'louislam/uptime-kuma:1'
    ports:
      - '3001:3001'
    volumes:
      - /home/user_name/Docker/uptime-kuma/data:/app/data
    restart: unless-stopped
    networks: ["nginx_default"]
networks:
    nginx_default:
        external: true
- Step 3: Finish the setup in NGINX UI as covered in its guide.
FAQ
How to use Uptime Kuma with Cloudflare to Restric Access ⏬
We need this configuration:
version: '3'
services:
  app:
    container_name: uptimekuma
    image: 'louislam/uptime-kuma:1'
    ports:
      - '3001:3001'
    volumes:
      - /home/user_name/Docker/uptime-kuma/data:/app/data
    restart: unless-stopped

    networks:
      - cloudflare_tunnel
#       - nginx_default

networks:
  cloudflare_tunnel:
    external: true
#   nginx_default:
#     external: true
What are some Uptime Kuma (F/OSS) Alternatives?
- You can be interested to Self-Host Gatus. - An automated developer oriented status page.
- Gatus Source Code. and licensed as Apache v2.
- And Also you can Self-Host ntify.
You can combine it with: Rasp Alert + Dashboard of Services + ntfy
PiAlert Config 👇
version: "3"
services:
  pialert:
    container_name: pialert
    image: "jokobsk/pi.alert:latest"
    network_mode: "host"
    restart: always
    volumes:
      - ~/Docker/pialert/config:/home/pi/pialert/config
      - ~/Docker/pialert/db/pialert.db:/home/pi/pialert/db/pialert.db
      - ~/Docker/pialert/log/:/home/pi/pialert/log
    environment:
      - TZ=Europe/Berlin
      - PORT=20211
      - HOST_USER_ID=1000
      - HOST_USER_GID=1000
