Cloudflare Zero Trust Tunnel
As more businesses shift to remote work and cloud-based infrastructure, securing network connections and protecting sensitive data has become more important than ever.
Cloudflare, has a tool called Cloudflare Zero Tunnel that provides a secure connection between your local machine and Cloudflare’s edge network.
In this blog post, we’ll explore what Cloudflare Zero Trust Tunnel is, its advantages, and how you can use it with Docker to expose services securely.
What is Cloudflare Zero Tunnel?
Cloudflare Zero Tunnel is a tool that creates a secure tunnel between your local machine and Cloudflare’s edge network, allowing you to securely access private resources on your network from anywhere.
It uses Cloudflare’s global network of data centers to provide a secure and fast connection that bypasses the public internet.
Zero Tunnel uses the QUIC protocol, which is designed to be faster and more secure than traditional TCP connections. It also encrypts all data using TLS 1.3, providing end-to-end encryption between your local machine and the server you’re connecting to.
Advantages of Cloudflare Zero Tunnel
-
Improved Security: Zero Tunnel provides end-to-end encryption between your local machine and the server you’re connecting to, which ensures that your data is protected from interception and eavesdropping.
-
Increased Privacy: Zero Tunnel allows you to access private resources on your network without exposing them to the public internet, which reduces the risk of unauthorized access or attacks.
-
Global Accessibility: Zero Tunnel uses Cloudflare’s global network of data centers to provide a fast and secure connection from anywhere in the world, which makes it ideal for remote workers or teams working across different locations.
-
Fast and Reliable: Zero Tunnel uses the QUIC protocol, which is designed to be faster and more reliable than traditional TCP connections, providing a smooth and consistent user experience.
Deploying Cloudflare Zero Tunnel with Docker to Expose Services
Docker is a popular platform for developing, deploying, and running applications in containers. It provides a way to package an application and its dependencies in a single container, making it easy to deploy and manage.
With Cloudflare Zero Tunnel, you can use Docker to expose services securely over the internet. Here’s how:
Create a Docker container for your service
Use Docker to create a container for your service, which will run on your local machine.
Later we will expose it to the internet through the Cloudflare Tunnel Docker network.
Example - A Python DASH App
I Discovered about Cloudflare Tunnel because I needed a safe way to expose safely my Python Trip Planner App with Weather without exposing my home’s IP address.
Install the Cloudflare Zero Tunnel Client
Install the Zero Tunnel client on your local machine and configure it to connect to your Cloudflare account.
-
We are going to be using the Clouflared Docker Container Image, which is open sourced in Cloudflare’s Github.
- You can get the details on the Cloudflare DASH
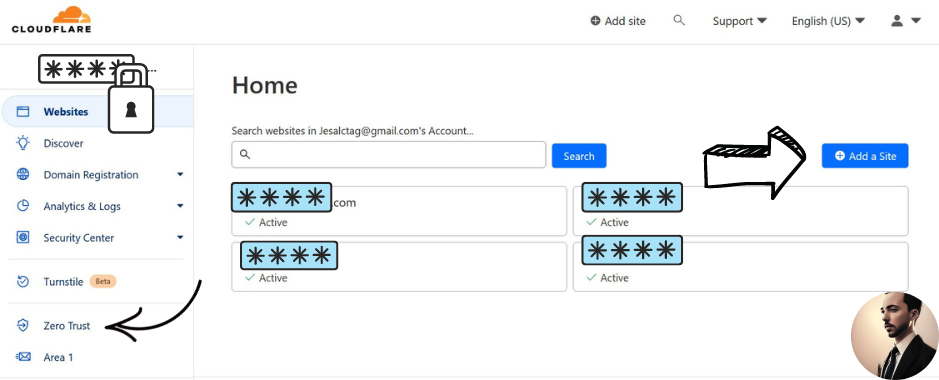
- Select the domain that is managed by cloudflare where you want to set the tunnel. Click on Traffic and Cloudflare Tunnel or directly on Zero Trust as indicated:
- You can get the details on the Cloudflare DASH
- You will be prompted with the Cloudflare One Dash
- Select Acces and then Tunnels to create a tunnel with Docker and get the token.
Cloudflare Zero Trust Tunnel - Docker install
If you want to use the CLI to install Cloudflared image with Docker:
- Create one network where we will link services to connect to the Cloudflare Tunnel:
sudo docker network tunnel
- Run the cloudflare docker container with your token with CLI:
docker run --name cloudflared --network tunnel --detach cloudflare/cloudflared:latest tunnel --no-autoupdate run --token yourfantastictoken
If you prefer docker compose (this is my favourite choice):
version: '3.8'

services:
  cloudflared:
    image: cloudflare/cloudflared:latest
    container_name: cloudflared
    command: tunnel --no-autoupdate run --token yourfantastictoken
    networks:
      - tunnel #a name for the Cloudflare Network
    restart: unless-stopped

networks:
  tunnel: #a name for the Cloudflare Network
In this case (docker-compose one), dont forget to use docker-compose up -d to run it.
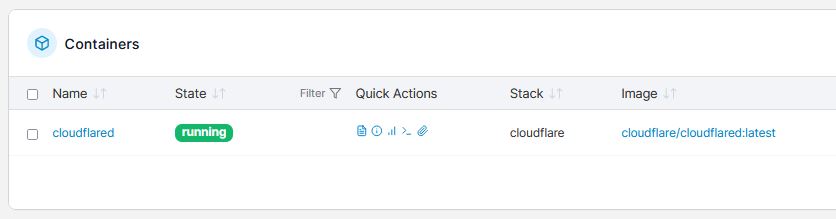
When the process has executed, you will see a new container created and with a network called tunnel, which we will use to connect our services to Cloudflare to expose them safely.
Adding services to the Cloudflare Tunnel Network
We have our Cloudflared Docker Container ready and operative.
Now lets connect one existing docker container (service) to the Cloudflare’s Tunnel network:
docker network connect tunnel your_docker_container_to_expose #network (tunnel) - service
Or if you want another docker container to be connected to the tunnel network from the very beginning…
…you can use the network tag with the CLI:
docker run --name Your_Container_Name --network tunnel -p 8050:8050 --detach Container_Image_Name
With my favourite, using the yml configuration to deploy as a Portainer Stack:
version: '3.8'

services:
  Your_Service_Name:
    image: Container_Image
    container_name: Your_Container_Name
    ports:
      - "8050:8050" #any ports of the service that you want to expose - this could be a Python DASH Application (example)
    networks:
      - tunnel #the name of our Cloudflare Zero Trust Tunnel Docker's Network

networks:
  tunnel: #this is the name of the network that we created in the Cloudflared Container
    external: true #we already created it!
-
Configure your Docker container with the service that you want to expose: Configure your Docker container to listen for incoming connections on a specific port, and set up port forwarding to forward incoming connections to that port.
-
Start the Zero Tunnel client: Start the Zero Tunnel client on your local machine and configure it to forward incoming connections to your Docker container.
Cloudflare Tunnel - Adding the Docker Container to the UI
We are almost there! Going back to the one dash cloudflare UI:
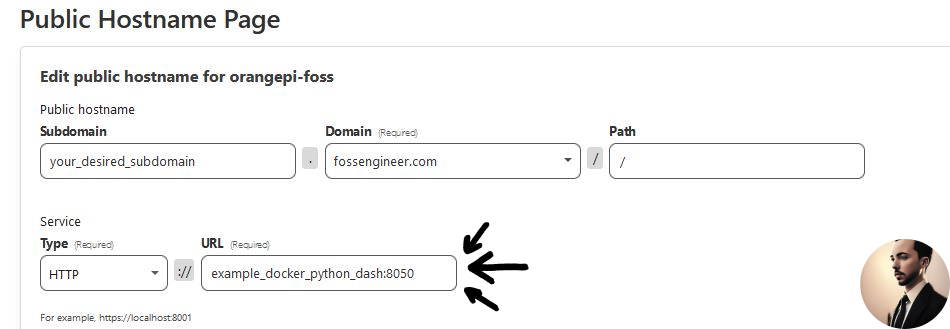
- Go to Access - Tunnels and select the one that you have just created - Add a Public Hostname in the Cloudflare web UI
- Select the desired subdomain, domain and path (where applicable)
- Then, add proxy host for example: yatch:8008
- The format is: Your_Service_Name:docker_port or Your_Container_Name:docker_port (Docker port,
not host port!)
- The format is: Your_Service_Name:docker_port or Your_Container_Name:docker_port (Docker port,
This is it!! Access your service securely: Your service is now accessible securely over the internet using Cloudflare Zero Tunnel. You can access it from anywhere in the world by connecting to the Cloudflare edge network.
FAQ
How to check my device local IP?
ifconfig
How to check the exposed IP?
Thanks to the used of cloudflare tunnels, you will be able now to expose self-hosted services without the need of:
- Exposing your Public IP addres
- Opening ports in your router’s firewall
curl your_selected_domain.com && echo
How can I contribute?
If the content of this guide was useful, please consider supporting the creation of further guides.

Cloudflare Tunnel vs Pangolin vs Tailscale
Cloudflare Tunnel routes through Cloudflare’s edge — great for public services with a domain. Pangolin is the self-hosted equivalent — same outbound-tunnel pattern, but the control plane lives on your VPS. Tailscale is a mesh VPN — better for private device-to-device access, not public service exposure. Pick by who needs to reach the service: anonymous internet users (Cloudflare/Pangolin) vs your own devices (Tailscale).
Can I expose multiple services through one tunnel?
Yes — that is the point. Add as many public hostnames as you want in the Cloudflare One dashboard, each routing to a different service:port on the tunnel network. Combined with Nginx Proxy Manager you can also do path-based routing.
What about real-time WebSockets and gRPC?
Both work over Cloudflare Tunnel — WebSockets are forwarded as upgrades, gRPC needs a HTTP/2 backend service. Useful when exposing things like n8n webhooks or Hoppscotch over the public internet without opening router ports.
Does the Cloudflare Tunnel client store my domain or credentials?
The token in the compose file is what lets the daemon authenticate to your Cloudflare account. Treat it like an API key — don’t commit it to a public repo. The token only authorizes the specific tunnel; revoke it from the Cloudflare dashboard if leaked.
Comments