Nginx Proxy Manager is a web-based proxy management tool that makes it easy to set up and manage reverse proxy servers using Nginx.
Why do I need a Reverse Proxy 😯?
-
Nginx is a high-performance web server and reverse proxy that is widely used in production environments to serve web content and balance traffic across multiple servers.
-
Nginx Proxy Manager simplifies the process of setting up and managing reverse proxies by providing a graphical user interface that allows you to configure and manage multiple proxy servers in a single location.
-
One of the main advantages of using Nginx Proxy Manager is that it helps to improve security by acting as a middleman between the client and the server.
- This can help to protect against attacks such as Distributed Denial of Service (DDoS) and SQL injection, as well as improve privacy by hiding the origin server’s IP address.
With Nginx Proxy Manager, you can easily create and manage proxy hosts, configure SSL/TLS certificates, set up port forwarding, and much more.
The NGINX Proxy Manager Project
- The NGINX Official Site
- The NGINX Source Code at Github
- The Docker Container to deploy NGINX
- License: MIT ❤️
The NGINX project is Free, Open Source and well documented
SelfHosting Nginx Proxy Manager
First things first: we need to setup Docker in our machine.
Pre-Requisites!! Just Get Docker 🐋👇
You can install it for any PC/mac/Linux at home or in any cloud provider that you wish.
It will just take few moments, this one. If you are in Linux, just
apt-get update && sudo apt-get upgrade && curl -fsSL https://get.docker.com -o get-docker.sh
sh get-docker.sh
#sudo apt install docker-compose -y
And install also Docker-compose with:
apt install docker-compose -y
And when the process finishes - you can use it to SelfHost other services as well.
You should see the versions with:
docker --version
docker-compose --version

#sudo systemctl status docker #and the status
Nginx Docker-Compose
The docker-compose file that we will use to deploy NGINX is:
version: "3"
services:
  app:
    image: 'jc21/nginx-proxy-manager:latest'
    restart: unless-stopped
    container_name: nginx
    ports:
      # These ports are in format <host-port>:<container-port>
      - '80:80' # Public HTTP Port
      - '443:443' # Public HTTPS Port
      - '81:81' # Admin Web Port - UI
      # Add any other Stream port you want to expose
      # - '21:21' # FTP
    volumes:
      - ~/Docker/Nginx/data:/data
      - ~/Docker/Nginx/letsencrypt:/etc/letsencrypt
#     volumes:
#       - nginx_data:/data #  - ~/Docker/Nginx/data:/data
#       - nginx_letsencrypt:/etc/letsencrypt #  - ~/Docker/Nginx/letsencrypt:/etc/letsencrypt


# volumes:
#   nginx_data:
#   nginx_letsencrypt:

networks:
  nginx_default:
    name: nginx_default
Access the UI at http://localhost:81, as specified by the configuration file.
During the first login, you will be able to access the UI with the default credentials:
- Email:
[email protected] - Password:
changeme
Using NGINX with other services
Important: When the container will be created, the network: nginx_default will be assigned to it.
This is the one that we will use when deploying other services with Docker that we want to expose through NGINX.
Adding Services to NGinX
You will need to add this in the docker-compose file of the service that you want to map to NGINX its network:
- Showing that the network already exists:
networks:
  nginx_default:
    external: true
- Making the service to expose visible by NGINX:
    networks:
      - nginx_default #this will allow communication between chevereto service and the existing nginx service
For example, this container will now be able to communicate with NGINX, as they share its network:
version: "3.7"

services:
  service_to_expose_to_nginx:
    image: an_image
    container_name: a_container
    ports:
      - 90:80 #you will use 80 to add the service to the NGINX UI.
    environment:
      env_var: a_variable
    networks:
      - any_other_network
      - nginx_default #this will allow communication between chevereto service and the existing nginx service

networks:
  nginx_default:
    external: true
You can also do it via docker CLI:
docker network connect nginx_default your_new_container_to_go_on_nginx_network
#docker network connect nginx_default focalboard
After any of these procedures, you can use the UI to add proxy host and expose the service.
How to get HTTPS Locally with Docker Services
When NGINX 💖 DuckDNS with Docker
If you have been self-hosting for a while, you might want to see the proper https signatures when accessing your services.
For a long time I was looking for a solution to this and finally I found it.
We can use DuckDNS FREE service together with NGINX.
-
To setup local HTTPS with NGINX, we need to:
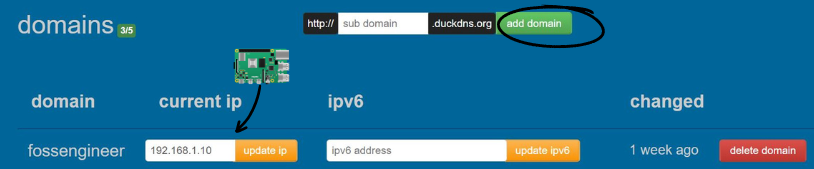
- Create a rule in DuckDNS with the Private IP address of our server where we run the self-hosted devices:
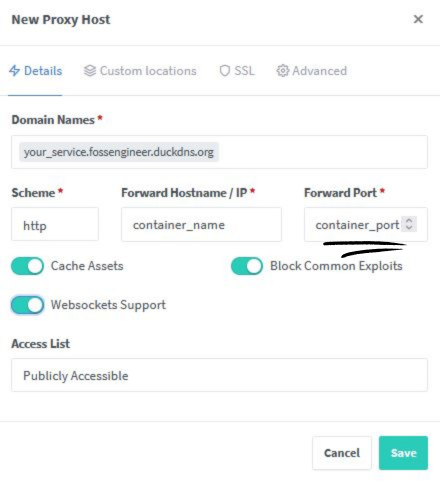
- Add in NGINX’s Admin Panel the Proxy Host: remember that you need the container’s Port!
Dont Forget to add the DNS Challenge:
Adding DNS Challenge for SSL
In the SSL Tab, you will need to input in this case the DuckDNS Token that you can get from their web UI.
Get the token here:

And add it in the credentials box:
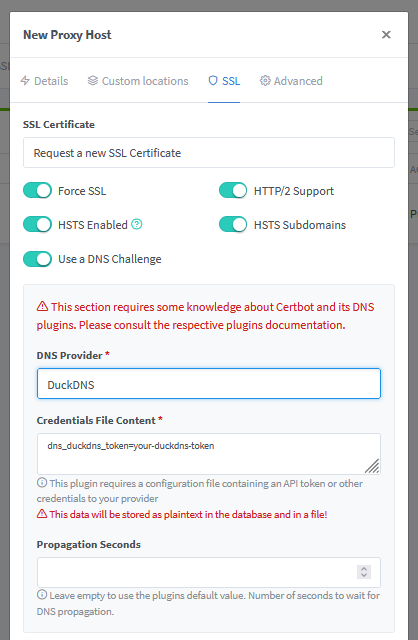
You can do similarly for other DNS providers
DuckDNS and Dynamic IPs
If your IP is not static, you might want to use this duckdns container prepared by linuxserver.
This will update the ip records automatically in your duckdns account:
---
version: "2.1"
services:
  duckdns:
    image: lscr.io/linuxserver/duckdns:latest
    container_name: duckdns
    environment:
      - PUID=1000 #optional
      - PGID=1000 #optional
      - TZ=Etc/UTC #optional
      - SUBDOMAINS=subdomain1,subdomain2
      - TOKEN=token #your duckdns API Token
      - LOG_FILE=false #optional
    volumes:
      - /path/to/appdata/config:/config #optional
    restart: unless-stopped
FAQ
NGINX Setup Examples
If this was too abstract, here you have few practical examples on how NGINX can secure services running in Docker containers.
NGINX + FocalBoard
I created a guide to expose Focalboard with NGINX and Docker as a reference to apply the same concept with any other service.
NGINX + Whoogle
- SelfHost Whoogle and get HTTPs + SSL together with NGINX
Comments