How to use Google without being Tracked
We have to admit that most of use use Google search services as a routine.
But at the same time we can get tired of the targeted advertisement.
Or of the same web search results.
It will allow us to use Google search engine locally, so our data is not leaked to their servers.
The Whoogle Project
Whoogle will help us with having private searches. And we will install it with Docker.
SelfHosting Whoogle
We are going to SelfHost Whoogle with Docker.
One recurrent topic that has to be addressed in the first place is how to setup docker in our machine.
Pre-Requisites!! Just Get Docker 🐋👇
It will be one command, this one, if you are in Linux:
apt-get update && sudo apt-get upgrade && curl -fsSL https://get.docker.com -o get-docker.sh
sh get-docker.sh && docker version
With that you will have Docker running. Now, lets include also Docker-Compose, as it will make this installation (and many others) really simple.
apt install docker-compose -y
#docker-compose --version
Whoogle Docker Compose Stack
The configuration file that we will use today to deploy Whoogle is:
---
version: "2"
services:
  whoogle:
    image: benbusby/whoogle-search:latest
    container_name: whoogle
    ports:
      - 5000:5000 #accessible through the port 5000
    restart: unless-stopped
Providing that the previous steps are clear, we can jump to our terminal and use:
nano docker-compose.yml
This will open a text editor, where we can paste the following configuration file:
To save, use CTRL+O, then CTRL+X to exit.
Then just deploy the service with:
sudo docker-compose up -d
If you are not confortable with the terminal, you can use Portainer to deploy Whoogle as a Stack with a UI - Copy Paste the same configuration.
You are ready to use Whoogle in any device at home, the service will be running in 0.0.0.0:5000 or localhost:5000 if you use the configuration file as it is provided.
If you have deployed it in one device at home, you can use it from any other connected at the same router, just use the internal IP of the device in which you made the deployment.
You can check that in Linux with:
hostname -I
Configuring Whoogle
When will access Whoogle, you can setup these configuration fields:
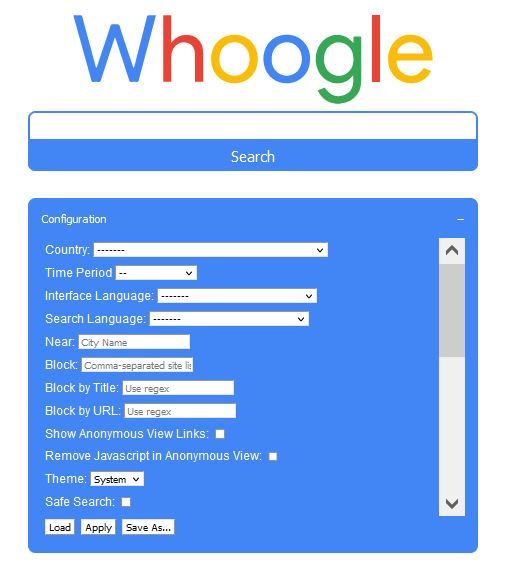
The list is longer than we can see in this snapshot, so I recommend you to spend sometime making Whoogle a perfect fit for you.
You can even customize the CSS for Whoogle UI!
Whoogle with NGINX and secure SSL
Its great to have Whoogle running, but even better is to access it with SSL.
For this we can use Whoogle combined with another service in Docker, NGINX , that will help us make the site secure.
Let me show you how to do it for free thanks to duckdns domains.
Configure DuckDNS and NGINX
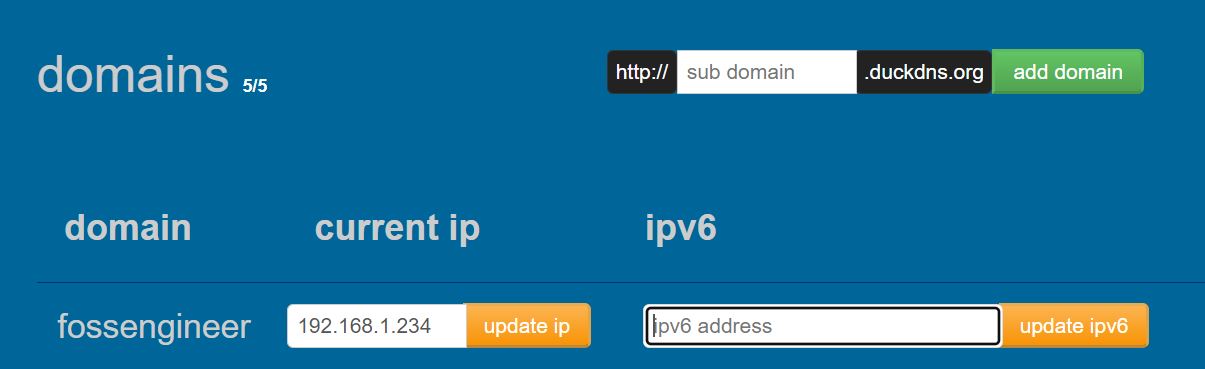
Visit DuckDNS site and have your subdomain pointing at your local IP where Whoogle is running. (You can also use it with public IPs, but lets leave that for the future).
The UI is really intuituve, and once you login, just fill the IP like so:
Great, we have DuckDNS ready, now, make sure to setup NGINX running and include the Whoogle Service:
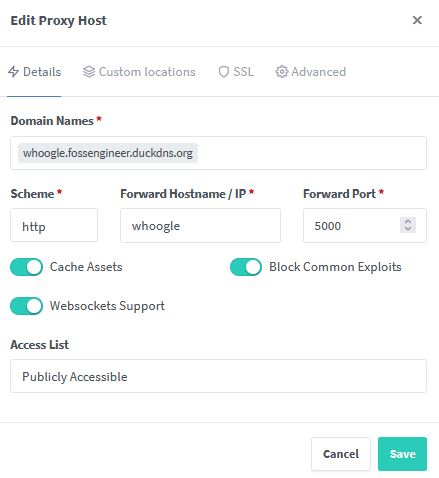
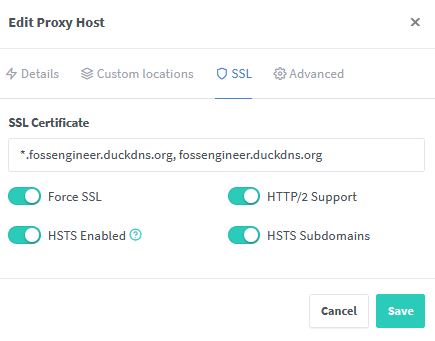
And now let’s make NGINX and DuckDNS work together to have our SSL certificate:
Whoogle and NGINX
We need to tweak our initial Whoogle configuration file so that NGINX is able to detect it.
---
version: "2"
services:
  whoogle:
    image: benbusby/whoogle-search:latest
    container_name: whoogle
    ports:
      - 5000:5000 #accessible through the port 5000
    restart: unless-stopped
    networks: ["nginx_default"]


networks:
    nginx_default:
        external: true
With this change, our Whoogle container is in the same Docker network as NGINX and we are able to have secure connections.
Other F/OSS SelfHosted Private Web Search
SearXNG with Docker
Another great option, is SearX

SearXNG with Docker - a Self-Hosted metasearch engine 👓👇
version: "3.7"

services:
  searxng:
    image: searxng/searxng
    container_name: searxng
    ports:
      #- "${PORT}:8080"
      - "3003:8080"
    volumes:
      #- "${PWD}/searxng:/etc/searxng"
      - "/home/Docker/searxng:/etc/searxng"
    environment:
      #- BASE_URL=http://localhost:$PORT/
      - BASE_URL=http://localhost:3003/
      - INSTANCE_NAME=my-SearXNG-instance
      #- FORMAT=html json
You will have SearXNG ready at: localhost:3003
FAQ
Some Privacy Respectful Search Engines
THese providers might (or not) change over time their approach with privacy / effectiveness of their search engine.
At the time of writing, these might be worth to have a look:
- Qwant
- PrivacyWall
- DuckDuckGo
- Brave Search
- Ecosia
Private Browser for safe Search
Not being tracked while we search the internet is nice, but it is even better when we combine it with a private and secure browser.
These are some open source Browsers worth to have a look ✅
- Mozilla (+uBlock)
- LibreWolf
- Brave
- Chromium
For Android users: Firefox and Brave will do the job. Also Bromite or Kiwi.
How to Deploy Nginx Proxy Manager
If you are interested in deploying a separated NGINX instance with Docker, I already created a guide for that here.
Comments