
Replit is brilliant until you hit the sandbox wall — no KVM, no custom kernel modules, no persistent processes between sessions.
GitHub Codespaces is comfortable until the bill arrives.
PequeRoku was built to solve both: a fully self-hosted cloud IDE where each user gets a real, persistent virtual machine they can install anything on, accessible from any browser.
What is PequeRoku?
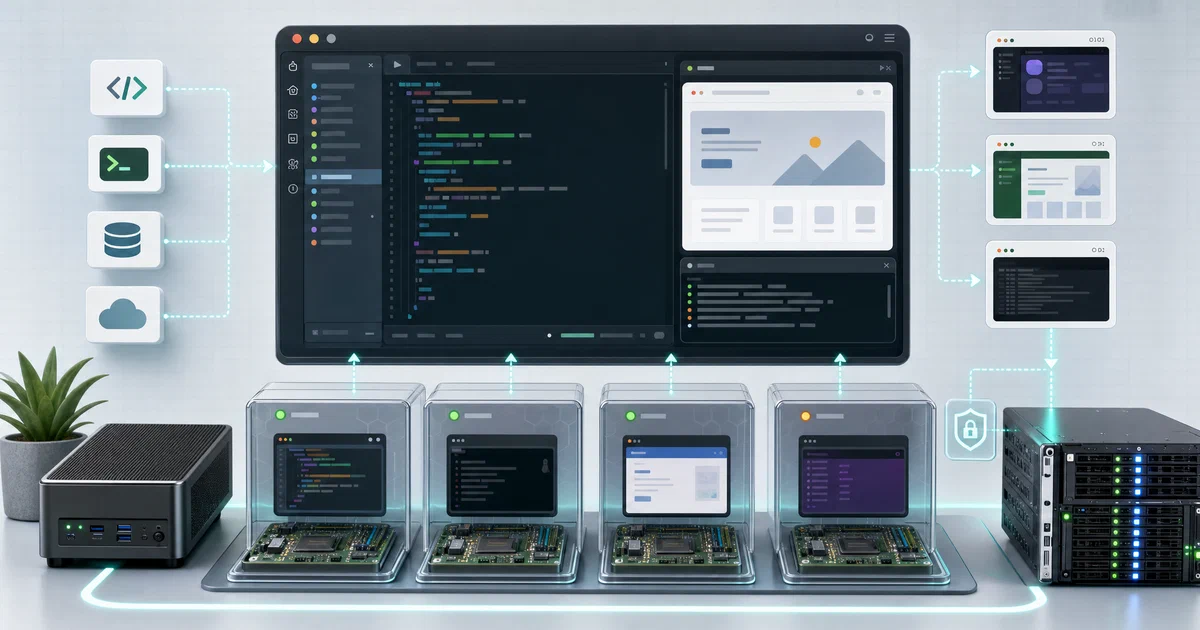
PequeRoku is an open-source platform for self-hosting cloud development environments. It provisions one persistent QEMU/KVM virtual machine per user — not a container, not a sandbox — and wraps it in a polished web UI: Monaco editor, multiple terminal tabs via Xterm.js, a file tree, CPU and memory charts, and an integrated AI assistant.
“Your own self-hosted Replit. Real VMs, always on, full root access, accessible from any device.”
PequeRoku Source Code on GitHub PequeRoku Wiki
Why self-hosters choose PequeRoku
- 💻 Real VMs — QEMU/KVM instances, not Docker sandboxes — install any package, run any process, load any kernel module
- 🔒 Full root access — the VM is yours; no capability restrictions or seccomp profiles
- 🔄 Always-on — VMs persist between sessions; pick up exactly where you left off
- ✏️ Monaco editor — the same editor engine that powers VS Code, in your browser
- 🖥️ Multiple terminals — open as many Xterm.js terminal tabs as you need, all bridged to your VM via SSH
- 📊 Live metrics — real-time CPU, memory, and thread charts pulled from the VM
- 🤖 AI assistant — OpenAI-compatible chat with memory, web search, and per-user daily quotas
- 👥 Multi-user — invite multiple developers, each with their own VM and resource quota
- ⚖️ MIT licensed — truly free, no per-seat fees
PequeRoku Tech Overview
PequeRoku is a four-service application: a Django web backend, a FastAPI VM microservice, a React SPA frontend, and Nginx tying them together — all backed by PostgreSQL and Redis.
How the VM magic works
The VM service (vm_service/) owns the QEMU lifecycle. When a user creates a container:
- A copy-on-write
qcow2disk overlay is created from a shared Debian 12 golden image — no full copy, just the diff. - A cloud-init seed ISO is generated with the user’s SSH public key injected.
- QEMU starts the VM with KVM acceleration, virtio networking, and the cloud-init drive attached.
- The service polls the VM’s SSH port until boot completes (up to 10 minutes by default).
Once running, all terminal I/O and file operations flow through Paramiko SSH connections — the web service bridges them to the browser over WebSocket. The VM never needs to be publicly reachable; only the Nginx proxy port matters.
Architecture at a glance
Browser
    │
    ▼
Nginx (port 80)
    ├── /            → static landing page
    ├── /dashboard/  → React 19 SPA (Monaco + Xterm.js)
    ├── /api/        → Django REST API
    └── /ws/         → Django Channels WebSockets

Django web service
    ├── REST: users, containers, quotas, config, AI logs
    ├── WS /ws/fs/   → file read/write (SSH bridge)
    ├── WS /ws/containers/ → terminal I/O (SSH → Xterm.js)
    └── WS /ws/ai/   → AI assistant (streaming)

FastAPI VM service
    ├── QEMU VM lifecycle (create/start/stop/delete)
    ├── SSH bridge via Paramiko
    └── Redis ← VM catalog (state survives restarts)

PostgreSQL 16 ← all relational data
Redis 7 ← Channels layer, sessions, VM state
Stack summary
| Layer | Technology |
|---|---|
| Frontend | React 19, Vite 7, Tailwind CSS 4, Monaco Editor, Xterm.js 5 |
| Web backend | Django 5.2.6, Django REST Framework 3.16, Django Channels 4.3 |
| VM microservice | FastAPI 0.116.1, Paramiko 4.0, QEMU/KVM |
| Database | PostgreSQL 16 |
| Cache / broker | Redis 7-alpine |
| Reverse proxy | Nginx 1.27-alpine |
| AI | OpenAI-compatible client (configurable endpoint) |
Self-Hosting PequeRoku with Docker
Get Docker 🐋
Install Docker on your system before proceeding:
- Linux: Official Docker Engine install guide
- Windows / Mac: Docker Desktop
Verify installation: docker --version && docker compose version
Before starting, you need two things that are not in the compose file:
- A QEMU base image — a Debian 12
qcow2file placed atsource/vm_data/debian12-golden.qcow2. You can create one withvirt-installor download a cloud image and convert it. - A dedicated SSH key pair for VM access (
ssh-keygen -t ed25519 -f ~/.ssh/id_vm_pequeroku -N ""). The public key gets injected via cloud-init; the private key is mounted into the VM service container.
Once you have those, create the two .env files and launch:
git clone https://github.com/HectorPulido/pequeroku
cd pequeroku/source

# Create env files from templates
cp web_service/.env.template web_service/.env
cp vm_service/.env.template vm_service/.env
Edit web_service/.env at minimum:
SECRET_KEY=replace_with_a_long_random_string
DJANGO_SUPERUSER_USERNAME=admin
DJANGO_SUPERUSER_EMAIL=[email protected]
DJANGO_SUPERUSER_PASSWORD=change_this_password

DB_NAME=mydb
DB_USER=myuser
DB_PASSWORD=change_this_too

REDIS_URL=redis://redis:6379/1
ALLOWED_HOSTS=localhost,127.0.0.1,your-server-ip
DEBUG=false
Edit vm_service/.env:
VM_SSH_USER=root
VM_SSH_PRIVKEY=/root/.ssh/id_rsa
VM_QEMU_BIN=/usr/bin/qemu-system-x86_64
VM_BASE_IMAGE=/app/vm_data/debian12-golden.qcow2
VM_TIMEOUT_BOOT_S=600
REDIS_URL=redis://redis:6379/1
NODE_NAME=local-node
AUTH_TOKEN=change_this_auth_token
Then start everything:
docker compose up -d
Open http://your-server-ip — the landing page loads immediately. Log into the dashboard at /dashboard/ with the admin credentials you set.
Services explained
| Service | Purpose |
|---|---|
nginx |
Reverse proxy — routes browser traffic to all services |
front-react |
React 19 SPA — the IDE UI (Monaco, Xterm.js, charts) |
web |
Django 5.2 — users, containers, API, WebSocket consumers |
vm_services |
FastAPI — QEMU VM lifecycle and SSH bridge |
db |
PostgreSQL 16 — all relational data |
redis |
Redis 7 — WebSocket broker, session cache, VM state |
All VM disk images are stored in ./vm_data/ on the host — back this directory up if you care about user data.
Running just the VM service (distributed setup)
PequeRoku supports running VM service nodes separately from the web backend. This is useful when you want VMs on a high-memory host and the web UI on a lighter machine.
cd source
docker compose -f docker-compose-node-only.yaml up -d
The VM service exposes port 8080. Register the node in the Django admin panel with its HOST:PORT and the AUTH_TOKEN you set in .env.
Configuring the AI assistant
PequeRoku’s AI assistant uses any OpenAI-compatible API. Configure it at runtime through the Django admin panel (/admin/) or via the Config model — no restart needed:
| Config key | Example value | Purpose |
|---|---|---|
AI_PROVIDER_URL |
https://api.openai.com/v1 |
API base URL |
AI_API_KEY |
sk-... |
API key |
AI_MODEL |
gpt-4o-mini |
Model name |
AI_DAILY_LIMIT |
20 |
Max AI requests per user per day |
AI_INPUT_TOKEN_COST |
0.000001 |
Cost tracking per input token |
Pointing AI_PROVIDER_URL at an Ollama instance (http://ollama:11434/v1) makes the entire stack air-gapped.
What to do after install
1. Set up a VM type — go to Django admin → Container Types. Define vCPU count, memory (MB), and disk (GiB) for each tier you want to offer.
2. Create users — admin → Users. Each user gets their own VM instance within the quota you assign.
3. Create a container — from the dashboard, click “New Container”, pick a type. PequeRoku boots the VM (takes a minute or two on first boot while cloud-init runs), then shows it as ready.
4. Open the IDE — click the container card. You get the file tree, editor, and terminal instantly. Open a terminal tab, run apt install anything — you have full root.
5. Configure AI — set the AI_* config keys in the admin panel if you want the AI assistant enabled for users.
Conclusion
PequeRoku occupies a unique space: it is genuinely closer to Replit than any other self-hosted project in this category, because it uses real KVM-accelerated VMs rather than Docker containers. That means no capability restrictions, no sandbox escape concerns, and no “why can’t I load this kernel module” frustration.
The cost is setup complexity — you need a QEMU base image and an SSH key before anything works, and the host must support KVM virtualisation. But for a homelab with a beefy server or a team that wants permanent cloud dev environments without a SaaS bill, it is a compelling option.
Alternatives worth comparing:
- Coder — enterprise-grade self-hosted dev environments; Kubernetes/Docker-based, much more configuration
- code-server — VS Code in the browser, single user, no VM management layer
- Gitpod — open-core; self-hosting exists but requires Kubernetes
- Replit — the original; excellent UX, cloud-only, sandboxed, per-seat pricing
Frequently Asked Questions
Does the host need to support KVM virtualisation?
Yes. PequeRoku uses QEMU with KVM acceleration. You need /dev/kvm accessible inside the Docker container, which means the host must have virtualisation extensions enabled (Intel VT-x or AMD-V) and KVM loaded (lsmod | grep kvm). Without KVM, QEMU falls back to software emulation — it works but is extremely slow.
Can I use a different base OS than Debian 12?
Any OS that supports cloud-init will work — Ubuntu, Fedora, Alpine. Build or download the OS as a qcow2 image, enable cloud-init in it, and point VM_BASE_IMAGE at the file. The VM service injects the SSH public key via cloud-init on first boot.
How many VMs can one instance support?
It depends entirely on your host’s RAM and disk. Each VM consumes its allocated RAM (configured per ContainerType) plus disk space for the qcow2 overlay (only the diff from the golden image, not a full copy). A host with 64 GB RAM could run dozens of 1–2 GB VMs concurrently.
Can I access my VM directly over SSH (not just the web terminal)?
The VMs are on an internal QEMU network. The web terminal (via Paramiko bridge) is the intended access method. You can configure QEMU to forward additional ports if you need direct SSH or expose specific services.
Is there a persistent file system across VM restarts?
Yes — the qcow2 overlay is persistent. Files you write in the VM survive stop/start cycles. Only deleting the container removes the overlay.
How do I back up user data?
Back up the source/vm_data/ directory on the host. Each VM’s overlay is a single .qcow2 file named by UUID. A daily rsync or snapshot of that directory is sufficient.
Comments