Torrenting in Docker: qBittorrent
Torrenting, at its core, is a technology that enables efficient file sharing. It’s a method that allows users to download files from multiple sources simultaneously, speeding up the download process and reducing the load on any single server.
You might have heard about decentralization and peer-to-peer (P2P) networks are fundamental concepts in the world of open-source software and digital technology.
They offer a different approach to data storage, distribution, and communication, which can have significant benefits for open-source projects.
My goal today? Setting up our very own private torrenting hub using qBittorrent, Docker, (and a VPN). These technologies will not only empower us with control over our torrenting activities but also ensure we maintain the privacy and security of our HomeLab.
Why using P2P?
-
Resilience and Redundancy: As mentioned above, decentralized systems and P2P networks are more resilient to failures and can provide better redundancy than centralized systems. This is crucial for open-source projects, which often rely on volunteer contributions and may not have the resources to maintain large, centralized servers.
-
Collaboration and Distribution: P2P networks facilitate collaboration and distribution of software. They allow developers to share and collaborate on code more easily, and they enable users to download software from multiple sources, which can be faster and more reliable than downloading from a single server.
-
Transparency and Trust: Decentralization aligns with the principles of transparency and trust that are at the heart of the open-source movement. In a decentralized system, no single entity has complete control over the data or the system, which can help to build trust among users and contributors.
Personally, I use P2P for sharing images of not so popular Linux Distributions. In this way I can support these projects by sharing part of my bandwith when I am not using it. We all want to have our new system downloaded fast and once we have it we can help others.
Torrents and VPNs
Sharing public data with other users is great, but we need to be aware of some threats (no worries, the torrenting with VPN setup in Docker will solve those):
-
Anonymity: A VPN can help mask your IP address, making it more difficult for others to track your online activities. When you’re torrenting, your public IP address is visible to all the peers in the swarm (the group of people downloading and uploading a particular file). This could potentially expose you to targeted attacks or unwanted attention.
- A VPN hides your real IP address, replacing it with the IP address of the VPN server.
- You will be able to share without exposing your home’s internet address
-
Security: VPNs encrypt your internet traffic, protecting it from prying eyes. This can be particularly important when you’re using a public Wi-Fi network, where your data could be intercepted by malicious actors.
- The encryption provided by a VPN ensures that even if someone is able to intercept your data, they won’t be able to read it.
Self-Hosting qBittorrent with Docker
We will be using a qBittorrent Docker Image created by the linuxserver people.
I will expose first the simpler version (without VPN), but then recommend you to use one (I use Mullvad VPN) if you plan to share files for prolonged period of time.
Self-Hosting qBittorrent locally with Docker (no VPN)
Even if you go with this approach, torrenting with Docker has its advantage:
- As docker containers are isolated from each other and from the host system. This means that a process running inside a container (like a torrent client) has limited access to the host system and to other containers.
- This can help to limit the potential damage if the torrent client is compromised by a malicious agent.
- For example, a compromised torrent client running in a Docker container would not have access to other volumes or containers unless specifically granted.
Use this configuration as a Portainer Stack or docker-compose.yaml to deploy qBittorrent:
---
version: "2.1"
services:
  qbittorrent:
    image: ghcr.io/linuxserver/qbittorrent #https://docs.linuxserver.io/images/docker-qbittorrent/#version-tags
    container_name: qbittorrent
    environment:
      - PUID=1000
      - PGID=1000
      - TZ=Europe/Madrid
      - WEBUI_PORT=6011
    volumes:
      - /home/Docker/qbittorrent/config:/config
      - /home/Downloads:/downloads
    ports:
      - 6081:6881
      - 6081:6881/udp
      - 6011:6011
    restart: unless-stopped
For the first time access, you will need to use the default credentials: admin/provided_in_container_logs (change them!).
docker logs qbittorrent
#docker logs -f qbittorrent #in real time
Self-Hosting qBittorrent locally with Docker and VPN (Mullvad)
- Now, this is the option that I recommend:
- One container with qbittorrent which traffic is routed to our VPN container (Gluetun with Mullvad)
- The second, VPN container, from where the ports are exposed now.
The configuration for qbittorrent to use our Gluetun container as VPN looks like this: SZEaH4vzY
---
version: "2.1"
services:
  qbittorrent:
    image: ghcr.io/linuxserver/qbittorrent
    container_name: qbittorrent
    environment:
      - PUID=1000
      - PGID=1000
      - TZ=Europe/Madrid
      - WEBUI_PORT=6011
    volumes:
      - /home/Docker/qbittorrent/config:/config
      - /home/Downloads:/downloads
    network_mode: "container:your_gluetun_container_name" #change gluetun to your VPN container name
    #network_mode: "service:your_gluetun_service_name" #change gluetun to your VPN service name
    # ports: #you wont need the ports in this configuration file, you will need to include them in the Gluetun container
    #   - 6081:6881
    #   - 6081:6881/udp
    #   - 6011:6011
    restart: unless-stopped
Make sure you have changed the default qbittorrent user/password before tweaking the ports.
The Gluetun docker container for this particular case need to have the 3 ports that we are commenting from the qBittorrent file:
- The 6881 is the torrenting port and the 6011 is the UI port to access the web interface.
- Remember that I am using Mullvad as VPN provider, but gluetun gives option to use many other VPN providers.
version: "3"
services:
  gluetun:
    image: qmcgaw/gluetun
    container_name: your_gluetun_container_name
    cap_add:
      - NET_ADMIN
    ports: #make sure to include these for qbittorrent to work
      - 6081:6881
      - 6081:6881/udp
      - 6011:6011
    environment:
      - VPN_SERVICE_PROVIDER=mullvad
      - VPN_TYPE=wireguard
      - WIREGUARD_PRIVATE_KEY=you_will_need_this_input_from_the_vpn_config_file
      - WIREGUARD_ADDRESSES=and_also_the_ipv4_version
      - SERVER_CITIES=New York NY #choose any available city
    volumes:
      - /Home/Docker/Gluetun:/gluetun
    restart: unless-stopped
FAQ - qBittorrent with VPN Docker
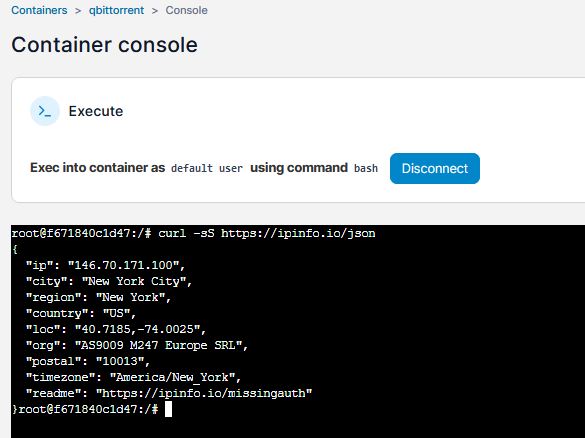
How can I be sure that I am torrenting through VPN?
I wanted to make sure that my home IP is not being exposed while sharing the latest Orange Pi Armbian image. For that we just need to use a very simple command from our qbittorrent container:
- With Portainer:
- Open the container details:
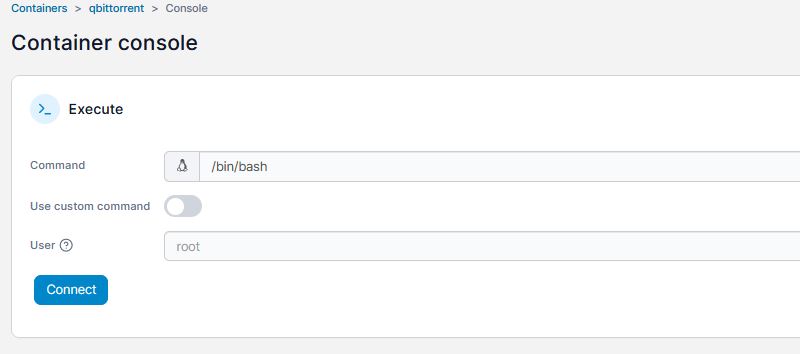
- Connect to it and use the command below (you guessed it, I am not in New York right now…):
qbittorrent-container-portainer-console
- Open the container details:
#docker exec -it qbittorrent sh
curl -sS https://ipinfo.io/json #the command to use
#wget -qO- https://ipinfo.io/json

#for windows you would use
#powershell -Command "(Invoke-WebRequest -Uri https://ipinfo.io/json).Content"
- Or if you prefer everything from the terminal of the server, use your container name with the curl command (you might need sudo):
docker exec -it qbittorrent curl -sS https://ipinfo.io/json #qbittorrent is the name of the container
How can I contribute?
If the content of this guide was useful, please consider supporting the creation of further guides.

Why route through Gluetun instead of running a VPN on the host?
Running the VPN on the host forces every container through it. Routing only qBittorrent’s traffic via Gluetun keeps the rest of your services (Plex, Uptime Kuma, etc.) on the regular network. The kill-switch is also automatic: if Gluetun loses VPN connectivity, qBittorrent loses connectivity entirely — no leaks.
Can I use this with other VPN providers?
Yes. Gluetun supports Mullvad, ProtonVPN, NordVPN, AirVPN, IVPN, Surfshark, Private Internet Access, and many more. Swap VPN_SERVICE_PROVIDER and provide the right credentials format. Mullvad is the example here because it accepts cash and doesn’t require an email address.
What if I want HTTPS on the qBittorrent UI?
Add an Nginx Proxy Manager container, attach it to the same Docker network as Gluetun, and proxy your-domain → 6011. Don’t expose the WebUI port directly to the public internet without auth and HTTPS — the qBittorrent UI is not designed for hostile networks.
How do I add Sonarr / Radarr to the same VPN?
Same pattern — set their network_mode to container:your_gluetun_container_name and expose any new ports through the Gluetun container, not the *arr container. All services that share the network mode share the same VPN exit IP.
Does this work on Raspberry Pi?
Yes. Use the ARM image of qBittorrent (the LinuxServer image is multi-arch) and the same Gluetun config. WireGuard performs noticeably better than OpenVPN on Pi — keep VPN_TYPE=wireguard if your provider supports it.
Comments